Friday 24 December 2010

One more day to go!

Merry Christmas, hope you all have a fabulous time.
Here are the cards that I made for my husband and daughter. I always struggle to make a card for my husband, but the Cricut came to my rescue and some old Christmas papermania papers I found in my stash were very welcome. The stamp used for my daughter's card was designed by Wild Rose Studio and coloured with Promarkers. The background was courtesy of Jak Heath's Blog
I will be spending Christmas at home with my family this year so whatever you are doing have a good one!

Thursday 23 December 2010

Merry Christmas


Hi all hope you are all ready to put your feet up with a large glass of wine this Christmas, I know I am.
Here are a couple of Christmas cards that I made. The base card was coloured with red and green distress inks,then I cut some mirri card with a Spellbinders die and then embossed it with a cuttlebug embossing folder. I then rubbed a red and brown staz-on ink pad over the embossed mirri card and then mounted it onto the main card. The baubles and sentiment cards were cut using the Cricut and then stamped and coloured with distress ink. The card was then finished off with red and green ribbon and there you have it.
Hope you all have a lovely Christmas and best wishes for the new year.

Wednesday 1 December 2010

Autumn Birthday Card

Hi there, hope you are all well. It's my husband's birthday today so I thought I would celebrate by making a late Autumn card, however I think I should have added a bit of snow and ice as it seems Autumn has come to an abrupt end judging by the ice and snow scattered around the country.
I was really looking forward to using these new stamps which have been designed by Sheena Douglas. The leaf plate is my favourite. I loved creating the colours for the leaves. I used yellow, green and brown Glimmer Mists before stamping onto the dried sheet of paper. I then sponged on some red distress ink to finish off the autumnal leaf look. The main image was stamped using Vintage Photo distress ink, then I brushed water over the image to create a water colour look. I also added some blue and green distress ink to the design to create a bit of depth.
The sentiments were cut using a Quickutz alphabet and then a silver rub on was added to highlight the ridges in the paper. A spellbinders nesting die was used for the centre design.
Hope to be back soon with some more designs. Ta ra...........

Tuesday 9 November 2010

Birthday Girl

This flower girl stamp has been well used for all the girly birthday cards that I have had to make this year. It is a Wild Rose Studio stamp which I coloured with ProMarkers. The background has been stamped with lilac Brilliance ink, then highlighted with a white gel pen. The gel pen acts as a resist so doesn't take on the distress ink colour that I have added using a dry bristle brush.
The sentiment has been cut using a Quickutz alphabet and the hole card has been finished off with a Fiskars punch along the edge of the design which has then been threaded with ribbon. I always try and buy different widths of plain white ribbon and then dye it with Staz-On ink to match my colour scheme, which is what I have done for this card.
So there you have it - two posts in a week, oooh I have come over all faint, think I need a lay down. :-)

Monday 8 November 2010

Belle Dame - Elusive Images

Hello all, just thought I would show the card I made using my blog candy win from Elusive Images.
I coloured the design with Distress Ink, but instead of applying the ink with a pad I used a large dry bristle brush. I found this to be so much easier as you can build the colour more evenly than using the cut and dry foam. I masked off the lady and then stamped the chandelier so it looks like it is in the background and the stylised flower that is around the edges is also from the same stamp plate.
Really pleased that my comment was randomly picked as the stamp plate is fab. Thanks once again to Glenda and her team at Graphicus.

Monday 11 October 2010

Bird Canvas

Hello folks. The begining of another week and I am up to my eyes in decorating. I have stripped the wallpaper in our front room with the help of my husband and daughter and then it is down to me to paint and paper the room again this week. Need to get my act together as the house is upside down with the contents of the front room distributed randomly in each room.

Realised I haven't posted for a while so thought I would show this canvas. The backfround has been stamped using a waterfall big and juicy inkpad and then a couple of inkadinkadoo stamp sets have been used to create the main features of the canvas and there you have it. Just off now for more decorating .......

Thursday 23 September 2010

Rose Birthday Card

Hello hope you are well. Things are a bit grey and wet here so I think summer has finally gone. Just as a little reminder for the passing season I thought I would post a cheery rose birthday card that I made for a friend. The main stamp was a do craft stamp and the background was a Tea Rose stamp from Joanna Sheen.
I now have my craft room in some sort of order so am able to find things again. You would not believe the state it had got into. Have no idea how it happened it just sort of evolved until it was impossible to find anything lol. So now there is no excuse to get creative..........
Be back soon xxx.

Saturday 11 September 2010

Happy Anniversary To Me!

Today is mine and my husband's 17th wedding anniversary. We all seem to struggle over men cards and this was no exception. I started with a DL base card and created the backing paper using some light blue card to which I stamped the Hero Arts script stamp. I then stamped the stop watch and key designs (all hero arts and picked up super cheaply in our local Home Sense store)over the script and then sponged distress ink over the top. The glasses, frame and border are all from a clear stamp set from Personal Impressions and the sentiment was created using the computer. The card was finished off with little photo clips. I think my husband appreciated it......!

Monday 30 August 2010

Hydrangea Tag Card Mk2

The eagle eyed amongst you may have noticed that my previous post was a hydrangea themed card as well. This was made with Elusive Images stamps but from a different set.
The base card has been stamped with just the top of the main image so as to just include the script. Then I stamped the main image twice using brown and then blue ink. The two images were cut into strips and then woven together. Where necessary I have trimmed the strips with a craft knife so the images fit together better. Once woven into place I mounted the design onto brown and then blue card before gluing to the base card. The small tag is from the same stamp set and has been attached using silicone glue. As you can see Distress Ink has been liberally applied to most edges and a small brown piece of ric rac has been added as a finishing touch. There you have it - hope you all have a great bank holiday, byee!

Sunday 22 August 2010

Hydrangea Tag Card

Hello folks, hope you are all doing ok. This card I have for you today was made with a stamp plate from Elusive Images. The background was created using a 
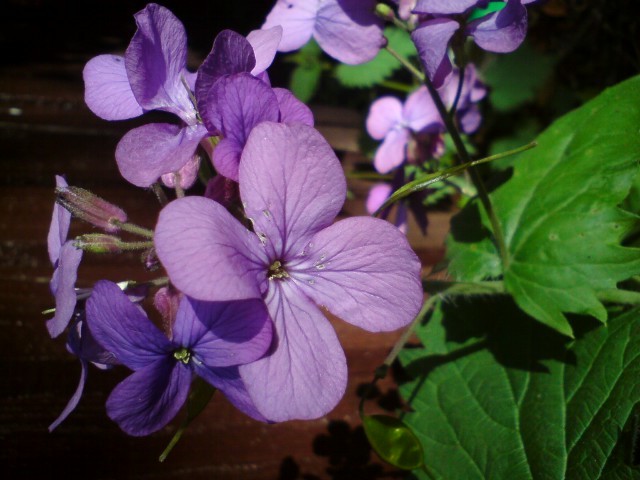
brayer and then embossed with the silver butterfly design from the stamp set. The main hydrangea design was stamped onto acetate and then the reverse side was covered with double sided sticky plastic. Once in place I peeled the back off to reveal the sticky side and then dabbed Ranger Perfect Pearl powders to colour the image from the reverse. I then cut around the image using a sizzix tag die. The small butterflies were also stamped onto the acetate and coloured in the same manner as the hydrangea tag. The background tag was put through a cuttlebug embossing folder that had been inked with a brayer before putting the paper in. When you run it through the cuttlebug machine the ink transfers to the debossed side. I love this technique as it gives your embossing folders another use. A Martha Stewart punch was used along the decorative panel and it was stamped using the corner stamp from the same Elusive Images stamp plate. The sentiment is from the stamp plate and the card was finished off with silver ribbon and the odd dab of crystal Stickles glue.
Hope you like......until the next time, tatty bye.

Friday 13 August 2010

Ball Boy


Hi all - hope you are all managing to dodge the downpours we have been having this week - what a pain for the school holidays. Still lets get on with the blurb eh?
The footballer is from Wild Rose Studio and I think it is great for boys of all ages from little ones to ones that still like to act as though they are little! I coloured the image with Promarkers and mounted on the card with silicone glue. The background football pitch is from Joanna Sheen's Messy Rabbit cd and the sentiment was added on the computer before I printed off the football pitch. 10 today was die cut from a Quickutz alphabet and there you have it another super quick card.


Saturday 7 August 2010

Girly Card

This was a quick card I had to make for my daughter as it was one of her friends birthdays. The stamp used was Wild Rose Studio and water coloured with Inktense Pencils. The paper is Dove Craft and the sentiment was Craftwork Cards. The flower was two plain cream Kaiser Craft paper flowers which I have water coloured with the Inktense Pencils and finished off with a flat back gem in the middle.
Have just got back from a very enjoyable if not tiring 4 days at Butlins, which is where my new header has come from courtesy of Bognor beach - good time was had by all - hope you are all well and will be back soon with another post.

Monday 2 August 2010

Fuchsia


This fuchsia card has been made with a set of stamps from Elusive Images. The centre image was stamped using Memento ink and coloured with Inktense pencils. The flower frame was stamped with versamark and then dabbed over with chalks. The centre of the card has been cut out and the Fuchsia mounted on the reverse of the front of the card with foam pads so it is inset slightly and then the purple frame was mounted on the front of the card with foam fixers just to add more depth. Thanks for looking - will be back soon.....

Saturday 31 July 2010

Heart Plaque

I have used this technique on numerous occasions as I love the effect this Elusive Images stamps gives when it is stamped into Hearty Clay.

The base used is a plain wooden panel bought from Hobby Craft, which I have coloured using distress and alcohol inks. I then placed a stencil in opposite corners and applied sno tex paste over the top. Holes were punched using a Crop O dile and the dangley hearts are shrink plastic versions of the large heart on the plaque.

Hope you all have a good weekend. Bye for now

Tuesday 27 July 2010

Under the Sea Necklace

Hi - I'm really not sure where July has gone, I have just checked back and realised nothing has been published on here since the begining of July :( Well I have a few things to add now as I entered the Elusive Images Design Team Challenge but alas I was not picked. Still at least I can now publish the projects I created to apply for the team. Obviously all stamps used are Elusive Images and a mixture of inks have been used. Mainly distress inks and inktense pencils to add colour - Staz-on for the shrink plastic and a dab of cream acrylic paint to try and create the aged look to the display box.
I am disappointed I didn't get chosen for the team but not surprised, however I do wish the lucky "chosen ones" good luck and I look forward to seeing their work.


Friday 2 July 2010

Melt Pot Creation

I had a play with my Melt Pot for the first time yesterday and found I really loved it. I thought I would try something fairly basic to start with so I found a clay cutter and poured the melted utee into it to see how it would look. I made the colour by mixing clear and silver utee and adding a few drops of blue and yellow melt art dye with a bit of Melt Art Flex. The swirly pattern came about completely by accident as I found that if you poured the melted utee in a swirl action it seemed to hold the pattern once the utee was set.I managed to add a hole by using a crop o dile and the piece did not shatter as the flex stops this from happening. I just added a couple of jump rings, some cord and clasp attachments and there you have a necklace! I also had ago at pouring the melted utee into some sugar paste moulds I had lying around and was quite pleased with the outcome. Will show these another day.
Bye for now, be back soon.......


Monday 21 June 2010

Mum


Sorry, nothing crafty to share as I have been rather preoccupied over the last few weeks. Sadly Mum lost her battle with cancer and passed away on June 13th. It goes without saying that I will miss her so much. So I thought I would post these pictures of the wild flowers I walked past on my regular morning walks, in my attempt to try and get fit and also use the time to think through all that Mum and me were going through and having to deal with.
I am not very good with flower names apart from the obvious so if anyone knows what these are please let me know. I would be most grateful.
Once Mum's funeral has taken place I hope to fully immerse myself back into crafting so normal posting will at long last be resumed!


Monday 31 May 2010

Oooh another bangle

This should have been posted yesterday in the same post as my previous bangle but blogger had other ideas.......still it's here now. Not sure I like them as they are different to what I do normally, but maybe I'll give them another go when I next go and visit my local craft shop and stock up on more supplies.

Sunday 30 May 2010

Bangle

I haven't posted for a while, but have a wooden bangle to show, nothing too exciting I know, but I have been doing some actual crafting the past couple of weeks. Shock horror! Yes it has been great! I decided to go for the design team call over at Elusive Images. The deadline is 15th June so I have been busy. I am glad I did as the request has kick started my non existent mojo, so even if I don't get chosen at least I can thank Glenda for helping to get my stamps and inks out again, hoo flaming hooray!
My mum is in hospital at the moment but with a bit of luck we may be able to get her back to her nursing home this week. I have shown her my design pieces and she said they were lovely so that pleased me (I know she is biased lol). So if anyone is interested in entering the challenge of being on Elusive Images Design team go along here and find out more.

Thursday 6 May 2010

Teenage Birthday


Today I have a teenager's birthday card to show you as it was my daughter's, cousin's birthday yesterday. The handbag has been cut using a Sizzix die and the background was created using a Cricut embossing folder. The dotty paper was found in my stash so not sure who designed it but it could have been HOTP. The 13 was cut using a Quickutz set of dies and it has been mounted onto a flower cut from a Cuttlebug die. I'm sure you will agree it is a simple design but does the job splendidly!

Saturday 24 April 2010

Artylicious Stamp Giveaway

Glenda is giving away some fab new stamps over on her Artylicious blog, this set is just one that happens to be my favourite, but go over and take a look, they are all fab

Friday 16 April 2010

60th Birthday, Cricut Style

Hi all, hope you are ok, sorry haven't posted very much lately, it has been very hard coming up with creative ideas and then putting them into action over the last four months as my Mum has been ill. This card was made for a friend's 60th birthday that was just the other day. Again, not feeling very creative so didn't like to play around with the inks, so I settled on using my Cricut and tried to be a bit creative with the Cricut Design Studio instead. I used the Jasmine Cricut Cartridge and some patterned paper that I found in my stash, but have no idea who the paper is by.
Bye for now.......

Sunday 4 April 2010

Happy Easter


This is the card I made for my Mum. As she is in hospital I didn't put Happy Easter as it wont be that fantastic for Mum. We are going to visit this afternoon with some of my hubby's home made pineapple meringue pie, so hopefully that will cheer her up.
The card was made using a selection of Cricut Carts including Stretch Your Imagination and George and Basic Shapes. I hand wrote At Easter Time as time was of the essence and didn't have an appropriate stamp! The flowers have been finished off with a blob of crystal stickles and I found a shiny butterfly in my stash to add to the handle of the basket.

Monday 15 March 2010

Mother's Day Card

Here is the card that i made for my Mum, a bit late showing it I know but here it is never the less! The heart in the middle was created by stamping into green hearty clay. I have used this technique before with this stamp and really love the result so here it is again. The stamp used was from Elusive Images. The same stamp was used in the background on the pink paper and the rose paper is from HOTP, the sentiment was printed from the computer and the little paper roses were coloured with pink rub on to tie in with the rest of the pinkness (if that is such a term!)
Hopefully be back soon.........ttfn

Friday 12 March 2010

Autumn Tree ......in Spring!


I was playing around with my brayer the other day and came up with this simple card. I clear embossed the tree panel in the middle of the card, masked around the edges with masking tape and then ran the brayer over the top. The card was finished off with a piece of rafia threaded through some punched holes. I like this effect as it looks like there are three layers but there is just one.
Bring on the weekend.....yay.....hope you all have a good one.

Tuesday 2 March 2010

Where did February go?


I can't believe I didn't post for the whole of February. I have been busy with visiting my Mum and a suppose life just became a bit more hectic as I haven't crafted at all. I have only made this card because a friend of mine's son is 9 tomorrow. The base card has been stamped with an Inkadinkadoo set in a blue dye ink. Happy Birthday was stamped with some Anita's alphabet stamps, the denim background was stamped using an Elusive Images stamp and the rest was cut on the Cricut using the Jasminie cartridge. I hope it wont be so long before I post again - ho hum!

Saturday 30 January 2010

Wooden Bangle


It's the end of January and my blog posting has been almost non existent! I will try and make up for it with this wooden bangle that I have customised. Nothing flashy as I am still experimenting, but I painted the whole bangle with a sage green acrylic paint and then stamped the design with black staz-on. The rubber stamp is from a set designed by Elusive Images. I found a black ProMarker was perfect to edge the bangle, much easier than fiddling around with a paint brush. I then added two coats of Glossy Accents to add a slight sheen and to protect the paint. I have a couple more of these to play with so I hope I can come up with something a little more adventurous for next time.

Saturday 16 January 2010

Dancing Queen

Hello everyone, here is a card that is similar to a couple I have done before but this style comes in very handy when I need to make a card for one of my daughter's friends. She is off for a birthday party sleepover tonight and needed a card and pressie to take along. The stamps used are from a set by Inkadinkadoo. I also made a matching box to make a box of sweets and a £10.00 note look a bit more special than just a thrown together box of sweets and some cash! The letters and numbers have been cut on the Cricut machine using the Jasmine cartridge, a dab of Dusty Concode Distress ink and embossed stars and hey presto a super quick card.

Saturday 9 January 2010

Thank You Cards

The free stamp from Craft Stamper magazine this month came in very handy to make my thank you cards for our Christmas presents. I stamped the lilac card with a script stamp from hero arts and the main swirl stamp which I think came from Galaxy stamps or something like that! I stamped the free stamp designed by Elusive Images into purple paper clay and cut around the image. When it was dry I went over the image with silver rub on to high-light the raised area. The sentiment has been printed from my computer and mounted onto a piece of silver mirri card which has had the corners rounded. To finish off I justed added some purple ink to the edges of the base card.


Friday 1 January 2010

Happy New Year

Happy New Year everyone. I tried to add this message last night using my new mobile phone, but I managed to delete the message before I published it. It either had something to do with me still getting to grips with my new phone or having one too many glasses of wine, or maybe a bit of both!
Just wanted to say thanks to everyone who has left a message over the past year, I really appreciate your comments - ooh just realised my blog is one year old today as well, happy birthday blog.